Notes from Jorik Philips’ talk on Making Nucs and Splits at the May 2016 Hudson Valley Natural Beekeepers Meeting*
Jorik joined us at Rainbeau Ridge where he shared his philosophy on making nucs and splits in one’s apiary and taught us his best practices.
Notes: a “nuc” = a “nucleus colony” (not the box – a “nuc box” – that the colony is contained in). A nuc is something that is used as a set of resources for other hives; a split is something that is expected to grow into its own stand-alone hive. A nuc that one purchases may indeed go on to become its own stand-alone hive.
Philosophy: Importantly, Jorik believes that if you make nucs in your apiary, you can become a sustainable beekeeper. This is because he believes that nucs do better overall than big hives, they tend to build comb quickly in their smaller space and they serve as a corrective for other situations that may come up in other hives.
Jorik noted that once you start beekeeping, you become aware that colonies may not make it through the winter (especially if you are treatment-free) and so instead of “restocking” your hives by continually buying bee packages, it is more sustainable and economical to make “nucleus colonies” from your own colonies.
Goals and Benefits: Jorik reviewed various reasons (goals) why you might want to make a nuc and the benefits of making them. He suggested that you need to decide for yourself what your goals are so that you can make the best decisions in creating nucs.
For example, a nuc can: provide a way to control swarming by moving frames from existing hives and establishing a nuc; boost production colonies by producing more brood; help a weak colony by moving brood frames to it; provide a source of emergency queens; and help recover from overwintering loses. He also said that if you put a frame with foundation in a nucleus colony, the bees will quickly draw it out, providing a good frame of comb for other hives. This is particularly helpful as honeycomb should be cycled out every 3-4 years.
 Overall Technique: In order to create a nuc, one has to steal active resources from an existing hive. This is important to know as it is essential to make choices in managing one’s apiary. If you are seeking to maximize honey production, this may be counterproductive. If you are seeking to manage your apiary for colony strength in-season, this may also be counterproductive. If you want to try to use your colonies to create resources available to bolster hives from time to time and/or to have core resources for the next season, this may be the perfect activity for you.
The basic needs of a nuc are a queen (or under 3-day old eggs for the nuc to make its own queen), capped brood and eggs for developing new brood, a population of nurse bees, and some combination of honeycomb, pollen, nectar and honey.
You can achieve this set of needs in several ways by moving frames of these resources from an active hive, from frames that may have overwintered and have stored honey in them, from shaking nurse bees in the hive in addition to moving bees already on frames, and from built out frames with honeycomb or with frames with some amount of foundation on them ready for the bees to do their great work. The amount needed of each of these items depends on when the nuc is created and on what is happening in nature at the time in terms of nectar flow.
Resource Hive: He mentioned that the technique he was going to talk about had a history dating back to the early 1900s. Basically the idea is to have two small colonies side-by-side in a partitioned box where they share heat and act as one big colony. This way, the bees can provide heat to each other over the winter and have a better overall chance of survival.
Jorik worked with Brushy Mountain to have them create a special set of hive boxes for this purpose. This is the “Resource Hive” and can be found here. The specially designed bottom board is set up so there are two entrances on opposite sides so the bees are entering the hives from two different directions. There are four frames on each side of the partition, two four frame supers to go above the bottom partitioned box, two separate inner covers, and an outer cover which covers both. He noted that the bottom board is not screened, which will keep the bees warmer, helpful even in the spring.
When setting up side by side nucs in the spring, he typically arranges the frames he is using in this order: Drawn Comb, Brood, Brood, Honey/Nectar, Partition, Honey/Nectar, Brood, Brood, Drawn Comb. The honey frame is next to the partition. This way, the bees are always working toward the center.
Miniature Laboratory: What you essentially wind up with when using a Resource Hive are two four frame “miniature laboratories”. He gave personal examples of using this lab to learn about various bee species, various queens, and honeybee genetics.
Timing: Jorik said you can make nucleus colonies anytime from spring to mid-August, depending on what your goals are for the nuc. If this is your first time, he suggested your first experiment should be a spring split using a mated queen as this would provide more time to correct any problems which arise. It may also be the case that your intention is to make a nuc that is really a split to become a full-sized colony. In that case, it is also good to begin this earlier in the season so that the hive has time to build itself up.
Jorik suggested that earlier nucs (April, May) need to begin with a larger population of bees (shake in lots of nurse bees) than later nucs (June, July) which could be smaller (due to the nectar flows and the amount of available resources outside versus inside the hive). Nurse bees can be found on uncapped brood frames as they are feeding the developing larvae. If you are making a nuc in June, it may only need one frame of brood due to the level of activity in nature and the potential for fast hive growth. If you want to overwinter the nucs and ensure that they won’t grow too big without having to move resources out of them before the winter, you can make the nuc in July. If the earlier nucs in a resource hive system grow large enough, you can place a honey super on top of the resource hive, with a queen excluder.
Depending on the season, Jorik said you can get multiple nucs from a healthy hive. He can often get 8, but sometimes 12 and said his all-time high was 16. Again, this is related to the goals one has for the nucs, the apiary itself and the resources nature is providing this season. If you keep taking frames from a full-sized colony, that colony necessarily weakens, which may or may not be okay with you.
The Queen: Jorik gave the pros and cons of several different ways of introducing a queen to a nucleus colony, including using capped queen cells from a hive that is preparing to swarm or that has swarmed, using a mated queen in a queen cage, using one of your own queens from a previous nucleus colony you made, and letting the bees make their own queen (i.e., a walk-away split).
If you know of an excellent source of proven, mated queens with desirable characteristics, buying one of them for a nuc would be an excellent option. This will bring new genetics into the apiary overall and is a faster way to have the nuc up and running than other methods. He recommends that when using a mated queen you may want to expose the bees to the queen cage for 24 hours before opening the candy plug, giving the bees a little extra time to accept the queen (although it isn’t essential).
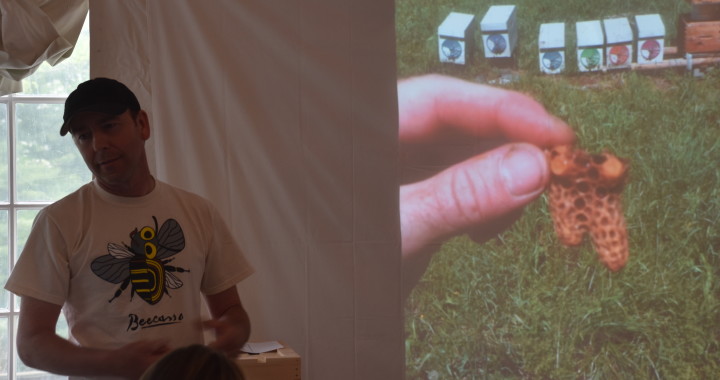
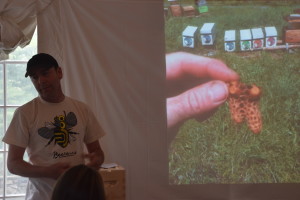
If you have found swarm cells in another hive and want to use them as the queen source for your new nuc, you can either move the whole frame that contains the swarm cells as one of your frames in the nuc or, if you have other frames you are using, you can cut out the swarm cells off of the other hive’s frame and place the swarm cells into the nuc. To do this, gently cut the swarm cells off of the frame, leaving a generous amount of honeycomb around it. Then, once you have arranged the frames as you want them in your nuc, very carefully place the cut out cells between two of the frames in the nuc, gently pushing them together to hold the cells in place.
You can also make a nuc by allowing the bees to make their own queen. Jorik calls that a walk-away split. To do this, put a few frames of brood, freshly laid eggs and some honey and lots of nurse bees, but no queen. The bees will recognize in just a few hours that they are queenless and begin to make a queen. Eggs need to be under 3 days old to be able to be made into a queen. This is because at the fourth day, the larva is suitable to become a queen rather than a worker and it will enable the bees in the nuc sufficient time to recognize their need for a queen and to begin feeding royal jelly until approximately day 12-14. It’ll take 5-6 weeks in total before the new queen has made her mating flight and begins to lay eggs. Add more bees to a walk-away split than if you were making a split using a mated queen. If the walk-away split doesn’t work, put the bees back in the hive you took them from and you haven’t lost all that much (just that the smaller population in the hive that you took them from may not have been as productive had you not ever moved the bees).
Comments about Preparing for Winter: In the fall, reduce entrances, and most importantly, check to see if they will need to be fed or if they have enough honey reserves. Jorik wraps his hives in black roofing paper and staples it to the hive. He also puts a homasote board on top of the inner cover and an insulation board on top of that, putting the outer cover on top of both of them. The homasote board is a compressed paper board product that absorbs moisture. The bees give off a lot of metabolic moisture during the winter. You don’t want this moisture dripping back on the bees as it makes it much harder for them to maintain the right hive temperature. Inspect the hive in winter to see if emergency feeding is needed. If so, Jorik feeds the bees by placing a sheet of newspaper on top of the frames of the upper box and then placing a ¾” or 1” shim on top and filling the shim with dry cane sugar.
Misc from Jorik:
• If you see capped swarm queen cells in a hive, it is most likely that the colony has already swarmed (although you need to note that if none of the capped cells has yet been opened, it is still possible that the hive hasn’t swarmed, though imminent).
• Small colonies don’t handle treatments as well as larger colonies, so if you are treating for varroa or small hive beetle, take this into consideration before making the nuc/ split.
• Queens can lay about 2,000 eggs per day.
• There are around 5,000 to 6,000 bees on a comb.
_________________
* This has been put together by combining the notes from the day of Bruce Shriver and Karen Sabath, supplemented with their beekeeping experiences. This is NOT meant to be gospel; please use your own judgment and experience in applying anything in this write-up!